Monday, July 29, 2013

Index-Card-A-Day 2013: Week 5


It's week 5 of Index-Card-A-Day 2013 (at least in my little world). No, it's really two days until the end of nine weeks of Index-Card-A-Day fun. Can it be over so soon? 

Well, not for me. I'm still catching myself up on cards and catching you up on my work. I want to keep all these posts and cards in order, but there may be a post later with cards I went back and made up for. Of course, for too lengthy blog posts, I'm not sharing every single index card. Some of mine came out awful (and that could be a post in itself). 

"Oh, My Deer" ICAD : 6-30-13
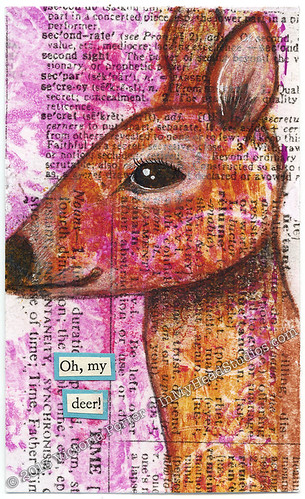
"Oh, My Deer!" ICAD : 6-30-13
Gelli™ printed tissue paper, acrylic paint, colored pencil, gel pen, text on 3" x 5" index card.

This scrap of Gelli™ printed tissue paper had the exact shape of a deer on it! I just added a few details like the eye, ear definition, shading, and the text.


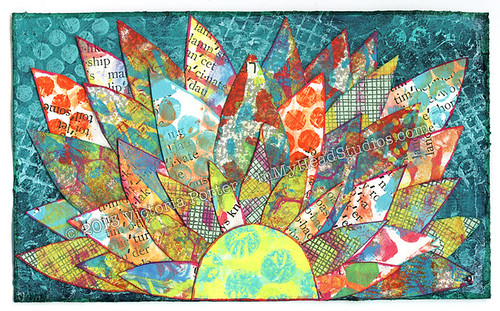
"Layered Gelli™ Printed Petals" ICAD : 7-1-13

Molding paste, acrylic paint, Gelli™ printed paper collage, marker on 3" x 5" index card. 

My Gelli™ printing sprees produce a ton of yummy papers for collage. These are mainly junk mail scraps and book pages I printed. All the petals were hand-cut and are layered in this collage. I used the end of my finger to curl the ends of all the petals, but the scan I have here doesn't show the real dimension of the piece. 


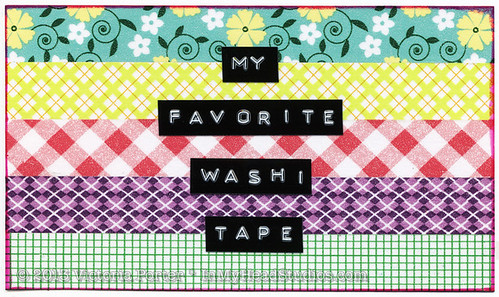
"My Favorite Washi Tape" ICAD : 7-2-13

Washi tape and DYMO lettering on 3" x 5" index card. 

I needed a really quick make-up card for this day so I just grabbed my five favorite washi tapes and my DYMO. Is it possible to just have five favorite washi tapes?! NO! 


"Summer Fun" ICAD : 7-3-13

Gelli™ printed background, handmade stamps, gel pen, calligraphy pen, archival ink on 3" x 5" index card. 

There were parts of this Gelli™ printed background that I really didn't like. So I stamped my pie chart and asterisk hand-cut stamps over it. The pie charts looked like beach balls to me on the colorful background. I colored them in with opaque gel pens and added some white gel pen accents. My calligraphy could use some help. I tried to disguise my mistakes with a hot pink opaque gel pen, but the calligraphy ink bled right through.

---------------------------------------------------
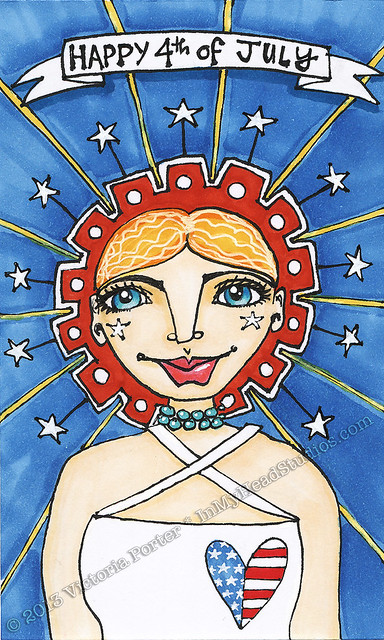
I did a card for the 4th of July and it can be seen in my post here
---------------------------------------------------


"Heart Garland" ICAD : 7-5-13

Gelli™ printed background with hand-cut paper hearts stitched to 3" x 5" index card. 

The Gelli™ printed background for this one sat on my desk since the start of Index-Card-A-Day. It was too pretty to cover up with a lot of collage. Each heart is Gelli™ printed book page and was hand-cut by me. I lightly glued them to the card before sending the lot through the sewing machine. I really like how this one turned out and may turn the design into something bigger.


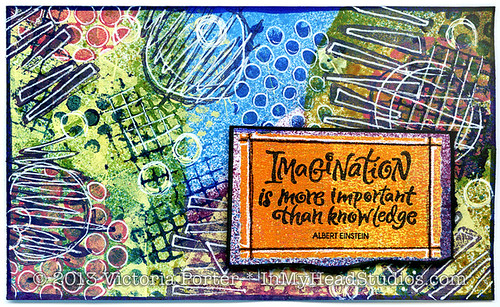
"Imagination Is More Important Than Knowledge" ICAD : 7-6-13

Spray ink, acrylic paint, stamp, ink, gel pen, paper collage on 3" x 5" index card. 

I masked and sprayed the background with spray inks. Then I stamped with paint and ink and doodled on it. The quote is stamped on a scrap of painty phonebook page and was given dimension with foam tape behind it. The paper backing the quote is part of the mask I used with the spray ink - it matched the colors! How handy!

- Vickie

Thursday, July 25, 2013

Index-Card-A-Day 2013 : Week 4


Humor me and pretend it's the end of June. Index-Card-A-Day 2013 is still going strong. It's week 4 (June 23-29) and I finally feel more like myself again after surgery. It's back to some serious art time. 

"Home Sweet Home" ICAD : 6-23-13

"Home Sweet Home" 6-23-13: This card began as a Gelli™ printed background. I glued down two pieces of printed tissue paper for the houses and painted over them. The scallops at the top are also Gelli™ printed and came from another project they just weren't working with well. I added a lot of detail with my gel pens. This is one of my favorite cards.
  

"What A Wonderful World" ICAD : 6-24-13

"What A Wonderful World" 6-24-13 : The background started with gesso etched with some texture. I added some grungy paint techniques and splattered paint on it. The torn paper roses are from old book pages, some in English, French, and Japanese. I lightly edged them with a pink pigment ink pad. The leaves are cut from my Gelli™ printed paper stash, which is ever growing. "Lyric" was one of the week's prompts so I went with one I could make with those Tim Holtz chit chat stickers. Each word has a Gelli™ printed background, which I distressed with my craft knife. The shiny rhinestone brads look funny in this scanned image of the card - but trust me - they shiiiiiiine. In order to tie the card together more I added stitching around the outside. 


"Owl" ICAD : 6-25-13

"Owl" 6-25-13 : Guess what?! It's another Gelli™ printed background! The owl is on very vintage French text paper. It was fragile so I glued it to a bit of thicker cardstock in order to draw on it. The owl consists of paint, marker, colored pencil, and gel pen. I drew the tree branch and the little stem with leaves, cut them out, and collaged them to the card. Then I cut the owl out and glued it on. A bit of a doodle around the edge completed it.


"Roses" ICAD : 6-26-13

"Roses" 6-26-13 : These roses are more of a complex paper layering design than can really be seen in this image. There are five paper layers: one for all seven flowers, one for the middle back rose, another for all four in front, one for the middle left front rose and one for the middle right front rose. Except for the last top layer, each layer was made to include the flowers that would be layered above it in order to avoid the lines that happen when overlapping this many layers. I got lazy with the last roses - the ones in the front middle - and you can see the line from where they overlap.

All the leaves and stems were cut separately and put back together creating a lot more layers. The image was painted only after all the paper layers were complete.  


"LOVE" ICAD : 6-27-13

"Love" 6-27-13 : Not being one who likes to waste paint, this card was painted with left overs from another piece. I dragged the paint across the card with an old credit card. The word is drawn with a big brush shaped Sharpie™ and outlined with a white gel pen.


"Time Flies" ICAD : 6-28-13

"Time Flies" 6-28-13 : It's another Gelli™ printed background! I disliked the left side of the print so I collaged a piece of Gelli™ printed junk mail over it. The wings and clock are stamped on tissue paper and collaged to the card. I added white and shiny silver gel pen to the stamped image. The little doodles were added last. 


"Not All Who Wander Are Lost" ICAD : 6-29-13

"Not All Who Wander Are Lost" 6-29-13 : The background is torn paper from old books and acrylic paint. I stamped the typewriter and bird on tan paper and cut them out. Then I had to engineer the paper banner coming from the typewriter. It's all one piece of folded paper. Stamping the lettering was nerve wracking as I had one chance to get it right or I had to make the banner all over again. Nailed it on my second try. A slit cut in the typewriter allowed me to tuck the end of the banner in it. I used foam tape under the parts of the banner that have words. Those shadows you see are real, not digitally added. Sweet! 

If you click on the images of my index cards, you will go to flickr where they can be seen much larger. Check out the Daisy Yellow Index-Card-A-Day flickr group while you're there! 

- Vickie

Monday, July 15, 2013

Index-Card-A-Day 2013: Week 2 & 3 Catch Up


"Blooming Buds" ICAD : 6-12-13

June was a whirlwind month. It was filled with sunny days, warm nights, and healing from gallbladder surgery. Yuck. I think I'm finally turning the corner on healing from that. No longer does every move or breath make me wince in pain. A dinner of steak and tater tots didn't have me wailing for death. Good times! I'll take 'em!

Without further ado, I present my week 2 and 3 Index-Card-A-Day work (even though we are already in week 7 of the whole thing).

The purple and pink card above (6-12-13) was started with fiber paste. I don't really know what this stuff is, but I like it a lot. It's weird... pasty yet sort of smooth, really sticky, and really fun. The texture it imparts is to-die-for. After that dried, I added some paint, handmade stamps, and flicked white paint on it. I used another handmade stamp on some Gelli™ prints - the flowers - and cut those out. The leaves and stems are also Gelli™ prints. 
  

"Sun Face Flowers" ICAD : 6-9-13

These three pretty ladies are drawn with ink. I decided it was toooooo fussy to color in. 6-9-13


"Flowers from the Hospital" ICAD : 6-15-13

Insert the gallbladder surgery derailment that sent my summer plans spilling all over the tracks. 

These flowers (6-15-13) were given to me by the nurses on my floor who felt bad I was so very sick after surgery and had migraines on top of it. I didn't get any index cards done in the hospital so the rest of the cards in this post (except the last one) were done as I convalesced at my mother's house with limited art supplies.   


"Red Haired Woman" ICAD : 6-16-13

Red Haired Woman: 6-16-13: Marker, watercolor, colored pencil, gel pen on 3" x 5" index card. (I need to work on my proportions!)


"Patio Table Pattern Zentangle" ICAD : 6-17-13

Patio Table Texture Zentangle: 6-17-13: gel pen on 3 x 5" index card. This is the pattern on my mother's metal patio table. I took a rubbing of it with the side of a pencil then drew over that in blue. I erased the pencil and added more lines.


"Feather Mandala" ICAD : 6-20-13

Feather Mandala: 6-20-13: Marker and gel pen on 3" x 5" index card. All I have at my mom's to work with are my nieces' art supplies - markers, watercolors, and colored pencils. Oh, and a lot of time on my hands to get fussy.


"Dream Catcher" ICAD : 6-21-13

Dreamcatcher: 6-21-13: pen, marker, gel pen. This continues the healing theme I'm drawn to right now. Plus I wanted to better learn how to draw a dreamcatcher.


"Find Your Bliss" ICAD : 6-22-13

Find Your Bliss: 6-22-13: Gelli™ print, acrylic paint, markers, gel pens, paint pen on 3" x 5" index card. Oh, my sweet art supplies! At last, I am home from my mother's house. This card started as a Gelli™ print that I did a few weeks ago to have backgrounds ready. I doodled and stamped all over it. I went back over the black stamping with gel pens to add details. This one is a little too busy for my taste. I think I was glad to have my supplies at the ready and threw everything within reach at it. 

Index-Card-A-Day 2013 is soon drawing to a close. I will keep posting my cards until I am caught up, which actually may take a couple weeks after ICAD is officially over as I kind of lost a few weeks to surgery. Employing some radical self-love and artsy boundary loosening is very forgiving! Try it!

- Vickie

Thursday, July 4, 2013

Happy 4th of July!


Happy 4th of July! ICAD Style!
ICAD3 :: JULY 4, 2013
Marker, ink, gel pen on 3" x 5" index card

©2013 Victoria Porter/In My Head Studios
All Rights Reserved

My Index-Card-A-Day for today is all about celebrating our country's Independence Day! Stars, stripes, and good old red, white, and blue!

I have been diligently working away at my index cards and {be creative everyday}. They are not up here on my blog or at flickr yet because I had slightly-emergency surgery last month. I apparently rock so hard I can grow my own stones! Gallstones, that is. 

It was horribly painful. I am still recovering. My surgeon said the biggest of the stones was a whopping 1.8 cm. That's almost an inch wide! Yowza!

So today I am also celebrating independence from my gallbladder and the associated pain. Unfortunately, that means my picnicking food for the fair today won't be anything fried or fatty. Gee, what's left then? Snow cones. The beer tent. Grilled chicken. Cotton candy. Yay. 

I hope you have a SAFE and HAPPY 4th of July! Go enjoy your hamburgers and hot dogs, clam bakes, and gooey desserts while you still have a gallbladder (if you still happen to have one)!


- Vickie

Tuesday, June 11, 2013

ICAD 2013 First Week Catch-Up


Presenting a round-up of my first 6 days of Index-Card-A-Day (and my {be creative everyday} practice, too!)

Queen ICAD3 : JUNE 2
ICAD3 : JUNE 2 : Queen
Prompt: crown.  Theme: rainbow colors.
Created with a background of painty phonebook pages from cleaning off my brayer when Gelli™ printing. The rest is acrylic paint, ink, gel pen, & colored pencil.
-----------------------------------------------------------

She Has Stripes: ICAD3 JUNE 3rd
ICAD3 : JUNE 3 : Fearless
Prompt: zebra
Woman cut from magazine. I added her stripes with a Sharpie™. The background is acrylic paint and my own handmade stamp designs.

-----------------------------------------------------------

Klimt ICAD :  JUNE 4
ICAD3 : JUNE 4 : Klimt
Gustav Klimt has been on my mind lately. Created with thick handmade paper collage,  watercolor crayons, a brown Sharpie™, white gel pen, gold gel pen, and graphite.
-----------------------------------------------------------

Love Fairy ICAD :  JUNE 5
ICAD3 : JUNE 5 : Love

This one doesn't fit any prompts. She has been hanging around in my head for some time and I had to let her out. I plan on doing something with her for a painting.
-----------------------------------------------------------

{be creative everyday} JUNE 6 + Index-Card-A-Day 2013
ICAD3 : JUNE 6 : {Grow Beauty}
This started with a scrapbook paper background I chose because I liked the colors. I used acrylic paint to stamp the flower designs that are my own handmade stamps. I added detailing with my white gel pen. The letters are stickers I embellished a little. Black ink added to the edges makes the contrast pop. 
-----------------------------------------------------------

For June 7th, I had an all day painting class and totally forgot to paint my index card there! So that one will be a "make-up" card related to my class. I might add a little photo of my painting!

I have TONS of ideas for cards this year. Running out of inspiration won't be a problem. Over the weekend I Gelli™ printed a bunch of cards to have handy backgrounds already started. I cannot recommend doing this enough for those days when you have little to no time to do a card. Just add a doodle or some text. Voilà!!

- Vickie

Monday, June 10, 2013

It's Time for Index-Card-A-Day 2013!


Hello, June! You are my favorite month. The flowers and trees are finally blooming all over. My raspberry bushes are bending under the strain of so many hopeful buds. Warm nights smell of lilacs, roses, and neighborhood fire pits. In other words, summer finally makes it's late entrance here in the "frozen tundra" of Rochester, NY.


June means the beginning of the 2013 Index-Card-A-Day Challenge (ICAD3)! One index card a day for June and July = 61 cards! Everyone is welcome to join. If you're late starting, that's ok. Just start! 

Tammy at Daisy Yellow has (completely optional) prompts and weekly themes. If you're kind of stuck and don't know what to do, these can be a helpful push.

Join the flickr group and share your cards! Join the Facebook group, too! 

Hashtags & such: On twitter + instagram + tumblr + facebook use #icad. On flickr tag your artwork icad.

Link your blog posts here: http://daisyyellowart.com/icad/icad-faq.html

{be creative everyday} JUNE 1
ICAD3 - JUNE 1, 2013
Painty phone book page collage background, acrylic paint, gel pens, Pitt pens, stamps, soft gel medium (semi-gloss). 
So here is my first card! The background is a collage of painty phone book pages that I use to clean off my brayer when printing. Ooohh, all the juicy colors left behind! It seemed a waste to, well, waste them. Details were added with gel pens and Pitt pens. 

I got lucky with my estimate of how long I needed to paint the white stripes to allow for the stamping of the words. Thanks, Muse!

I truly hope you decide to join in the fun. No pressure on all 61 cards. I had a blast doing this last year and I didn't make all 61. The world did not end. :)

Now shut off the computer and make some index cards!

- Vickie


Friday, March 29, 2013

"Soar & Fly" Art Journal Page


"Soar & Fly" ArtJournal Page : Before

From this ...

"Soar & Fly" Art Journal Page : Before 2

... to this ...

"Soar & Fly" Art Journal Page : Full

... to this! Ta da!

This page had more planned for me than I did for it! My muse was here in my presence. I could hear her whispering to me to "let my Little Bird fly". 

"Soar & Fly" Art Journal Page : Bird Cage

Fly, Little Bird. 
Fly and soar. 
Trust your wings. 
Sing your song! 
Your amazing tiny heart 
will take you anywhere.

"Soar & Fly" Art Journal Page : Bird

This bird stamp is my design, and is made from foam sheet and cardboard. It is outlined in orange Copic marker and then black Stabilo pencil for dimension. The bird cage is white-out pen. I drew over that with a sparkly gel pen to make the bars look shiny and metal. 

"Soar & Fly" Art Journal Page : Trust Your Wings

The purple circle and scalloped dictionary page were scraps laying around. I added my handmade button stamp to the circle and layered them. I used my label maker to print the words because I was in a hurry. They are pixelated, and that bugs me, but it's not a deal-killer on this piece. 

"Soar & Fly" Art Journal Page : Soar

The letters for "soar" were brown to start with. I painted them and stamped some dots and lettering on them with paint. The dimension the raised letters add is lovely! 

The little heart banner is punched hearts from book pages and baker's twine. A little watercolor splashed on the hearts creates some interest. 

"Soar & Fly" Art Journal Page : Stitching

Look! I managed to sew in curvy lines - not jagged straight-ish arcs! The paper itself is created with gelli plate printing and white gel pen. This is before I drew the heart and swirly black line.

"Soar & Fly" Art Journal Page : Banners

To connect the theme of singing I glued down some tissue tape with music on it. That needed some color so I washed a little acrylic paint over the tape. Using a Molotow white paint pen I wrote the words "sing your song" and added black to make it more readable. Some little doodles and stars here and there finished the piece nicely. 

There you have it! This is the first art journal page I have completed this year. It took several days to work out. I printed the background about a month ago with my gelli plate right into the journal. 

I worked on it here and there for a while until the full image finally came together. I wanted to experiment with some ideas I had in my sketchbook, and this piece gave me the chance to work those ideas out more thoroughly. That's what I love about art journaling! Mad science experiments! Focusing on the process! Mastering techniques! Practice  Practice. Practice!! 

I hope you have a wonderful weekend! Happy Easter if you celebrate! Also, Mr. M turns 40 this weekend! Huzzah!
- Vickie

Wednesday, March 13, 2013

"Summer Evening" Gelli Print


Since my Artist Spotlight post went up at Gelli Arts' Facebook page I've had some inquiries into how I've created some of these prints. Several people had questions regarding the vibrancy of my prints. How do I do it?

To be honest, I'm not completely sure. I really had to go back and almost dissect my work to produce an answer. 

Right now my best "guess" is using color theory to not layer colors over each other that produce muddiness (like putting a bright yellow over a purple because red + blue + yellow = mud). 

I use rather bright paint colors to begin with. As with any kind of paint the colors vary in opacity and translucency. Knowing your paint helps a lot. 

Let's take a look at my "Summer Evening" gelli monoprint.

I will freely admit much of this print is a happy accident. This piece was very experimental from the start except for the leafy vine stencil I cut freehand. 

"Summer Evening" Gelli Monoprint

The first layer of paint is a dark cranberry purple -  Yes, I know I just ignored the suggestion above about putting those colors in a bottom layer. Experimental, remember? 

The large circles, when wiped out with my finger and a paper towel, looked really nice with how organic the edges became when printed. 

I added a little fuchsia over that cranberry purple. You can see in the wiped out circles the little lines and squares of fuchsia. 

"Summer Evening" Gelli Monoprint 3

I wanted a lot of color and layers under the vine to create a lot of dimension. Intending to just print on the left side under where I planned to put the vine stencil, I inked up my gelli plate with yellow. While printing the left side of the piece, the right edge of the paper fell out of my hand and into the yellow paint. EEEK!

Mud! Instant muddy brown. What to do?! Grab a baby wipe!

I figured there was enough paint on the paper already that it would hold up to a wet wipe down. When I wiped away the yellow paint it left this glowing, bright yellow orange behind. The fuchsia and yellow created this color in the white space of the wiped out circles. So basically this side of the print received a yellow color wash. Nice happy accident! 

Incidentally, you can see how awful that yellow muddied things up if you look in the upper right corner of the piece. There is some of that yellow that I didn't wipe off. (I suppose if I wasn't going for bright colors and wanted brown I would have been satisfied with that yellow.)

"Summer Evening" Gelli Monoprint 2

I printed a thick layer of turquoise while masking out the vine with my hand cut stencil. Then I used a handmade stamp over that with more fuchsia. Several more handmade stamps, some stenciling with punchinella, and some white gel pen brought the piece together.

Ta da!

"Summer Evening" Gelli Monoprint 4

Working on this piece got my brain wondering how color washes over prints would look. I added Distress Stains over some parts of other prints, and it looks really cool. Adds a pop the piece didn't have before. I also seem to have a thing against white space. I love full blown color all over. I made some prints on paper I covered completely in Distress Stains and watercolor. 

Color washing first also helps me avoid the "white blank page" staring contest. It's already started! All I'm doing is adding to it, I tell myself reassuringly. 

I would love to share in the joy of your happy accidents! Link up to your posts about them in the comments, please!


- Vickie

Monday, March 11, 2013

{be creative everyday: 2013} MARCH 8


Gelli Print Collage - work in progress

paper collage of acrylic monoprints, gel pen, ink, handmade stamps
5.5" x 4.25"
© 2013 Victoria Porter


This isn't quite the finished version. I added a little more detail to it after I took this photo with my phone. 

All of these pieces of paper were printed on my gelli plate. Some were already printed with text, like the Japanese newspaper I picked up on a visit to Austin, Texas, and some dictionary pages. Using my hand-carved stamps and black archival ink, I stamped some designs on some of the pieces.  

I'm deciding whether or not to send it through my sewing machine for some random stitching. It feels disparate to me and needs some cohesion. 

What do you think? Stitching or not?

Happy Monday!

- Vickie

Wednesday, March 6, 2013

Gelli Arts Artist Spotlight: ME!


If you've been reading along then I don't have to tell you how much fun I am having working with monoprinting. Printing has always been in my blood in some form or another - from lino block cutting and printing, rubber stamping (it is too a form of printing), making my own stamps out of anything and everything, creating collographs, screen printing, and now making monoprints with a Gelli plate.

The joke around here is that if it sits still long enough I will either print on it or ink it up to make a print on something else. Nothing with wonderful texture is safe around my inky and painty fingers! Yes, I've been caught inking up interesting cracks in the sidewalk and making prints from them!

Right now I'm having such a blast with my Gelli plate that I've hardly had time been able to stop printing long enough to fill you in on some extremely cool news! 

I was contacted by the folks at Gelli Arts, the company that makes the Gelli printing plate, about the prints I posted to my Facebook page and blog. They enjoyed them and asked for some images to feature me in an Artist Spotlight on their Facebook page. They posted 18 images from various pieces I have made in the last few months. 

Vickie Porter Artist Spotlight Album on Gelli Art Facebook Page


How cool is that?! 

Rendered even more speechless by the response - thus delaying this post further - I am still at a loss for words over the number of comments and "likes" my work has received. 

(The album itself currently has over 100 "likes" and 13 shares. One piece has 125 "likes"! The amount of traffic here and almost every other site I have for In My Head Studios has roughly tripled.) 

Gelli Arts, I cannot thank you enough. To have my work shown alongside the work of many of my favorite artists is intensely humbling. The positive response is icing on the cake, next to which I have been doing the Happy Dance of Joy for more than a week. 

Several people have had questions about how I make my prints. I don't currently have a tutorial about gelli printing on this blog to share, but I am working on a few ideas for showing you how I do the printing. Stay tuned!

In the meantime, check out the rest of the Gelli Arts Facebook page for some awesome artwork and a ton of resources about printing. Their Pinterest page is chock full of eye candy, tips, and tricks, too.

As for me, I am headed back into my hermit hole to make more prints! 

- Vickie

Monday, February 25, 2013

The Owl Eyes Have Spotted Me!


As Seen On Owl Eyes Magazine

A few days ago I was contacted by a very nice student from the University at St. Andrews in Scotland asking if they could use a photo of my "Road Trip" Domino Keychain for an article about a trip through the southwest of the United States. 

Of course, I was thrilled to be asked, especially after looking through their wonderful online magazine called Owl Eyes. The writing is excellent, and it is a fascinating look into life at "uni" in Europe. 

St Andrews is Scotland's first university and the third oldest in the English-speaking world, founded in 1413. They celebrate their 600th anniversary this year! 600?! Wow!

Road Trip Domino Keychain
"Road Trip" Domino Key Chain
Mixed media and paper collage on a domino
© 2013 Victoria Porter

I highly recommend reading some of the articles to get a feel for the life there. The Big Top Ball is a good read and shows how different US and European colleges are in relation to student activities (and drinking on campus).

Reading through the article That Time I Went to A 65th Birthday Party In Spremberg had me laughing! How I would love to hitchhike in an event sponsored for charity! That doesn't happen here in the States. 

It makes me want to go to University at St. Andrews! Or at least visit Scotland - that is on my bucket list. I'll need an amphibious car to make it a road trip, though! 


- Vickie

Thursday, February 14, 2013

With Love From Friends! 2013


Card for With Love From Friends (1)

Happy Valentine's Day!!!

For the past three years I have been delighted to volunteer for With Love From Friends (WLFF) by making Valentine's Day cards for people who are without family or friends to remember them. 

The fabulous Eve Elzenga developed and coordinates this project. WLFF is such a wonderful program. I adore Eve and her work. I'm not alone... Eve was the recipient of a Jefferson Award in 2011 for her public service for WLFF! 

Eve strives to have high quality cards made with great materials and by artists in our community. She really wants the cards to be well made as the people who get them really do cherish them and deserve nice cards created by adults for adults. In years passed she opened her home for all of January so people could come over and make cards. Her collection of high quality supplies, papers  embellishments, ribbons, and little gorgeous what-nots were made available to artists to pick up and use this year. She collects Valentine art supplies all year round. 

As someone who has been lucky enough to spend a lot of time with my grandparents and great grandparents, I appreciate and value my elders. Now that they are gone, as well as my beloved father - who will always be my first Valentine - I felt like their memory needed to be honored, especially on a day all about love. So in memory of my loved ones passed, I made ten cards for With Love From Friends

Card for With Love From Friends (2)
"You Are Loved"
acrylic monoprint, paper, mixed media
4.25" x 5.5"
© 2013 Victoria Porter
My cards started as Artist Trading Card sized (2.5" x 3.5") original monoprints made on my Gelli Plate. I added red and pink cardstock mats behind and stitched them together. The heart is crumbled red cardstock inked to add some dimension. Don't you love the tiny staples?! Everything but the straight lines on the mats behind the monoprint are all hand cut by me. The words are all hand stamped. The wings are my design and took a long time to cut out. (I do not even own a die cutting machine. I do it old school!)

Each card I made is a one-of-a-kind piece of artwork as all of the monoprinted backgrounds are different. 

Every card donated to WLFF is stamped with "With Love From Friends" on the inside. Did someone say 1500 cards need to be stamped?!?!?! I am so on that. My mother and I spent many hours stamping the inside of cards last week. We had a ball hanging out with Eve and her partner! 

This year WLFF is in need of a Sizzix Big Shot Die Cutting Machine, Valentine themed cutting dies, and cash gifts so they can update their website. Supporting Eve in her efforts pays off in ways you can't even imagine. Hop on over to WLFF and see how you can help for next year! 


- Vickie

Thursday, January 31, 2013

Piles of Prints!


If you are anything like me and have amassed hundreds of prints from your Gelli Plate printing sessions...

Pile of Gelli Prints

...then you are BURIED in wonderful, gorgeous papers! Happy digging!

What to do with all these prints?! DOODLE! 

Flower Doodles on Gelli Print
acrylic monoprint on paper, marker
4" x 5"
Victoria Porter
© 2013

Flower Doodles on Gelli Print 2

- Vickie

ShareThis